How to use Git and GitHub for beginners
A practical guide to Git
Table of contents
- What is Git?
- Conventional Commits and other Git best practices
- Working with others
- My most useful Git commands
- git init
- git remote add remote-name repository-name or url
- git status
- git add directory
- git commit -m "commit-message"
- git commit -am "commit-message"
- git branch branch-name
- git checkout branch-name
- git checkout -b branch-name
- git branch -D branch-name
- git reset --hard commit-hash
- git push
- git push --force
- git push --set-upstream remote-name branch-name repository-name
- git push -u remote-name branch-name repository-name
- git fetch
- git pull
- git diff commit-hash-source commit-hash-destination
- git merge branch-name
- git cherry-pick commit-hash
- Conclusion
Git is one of the most useful tools that any developer has up their sleeves. No matter what kind of development you are doing, understanding how to use Git will be a valuable asset that can save your butt.
There is often a lot of anxiety with Git, but if you understand Git and everything you can do with it, there is no reason to fear.
I will do my best to explain Git, how to use it, and provide a list of all the most common commands that you may need to use. Bookmark this page for easy access to the most useful Git commands.
What is Git?
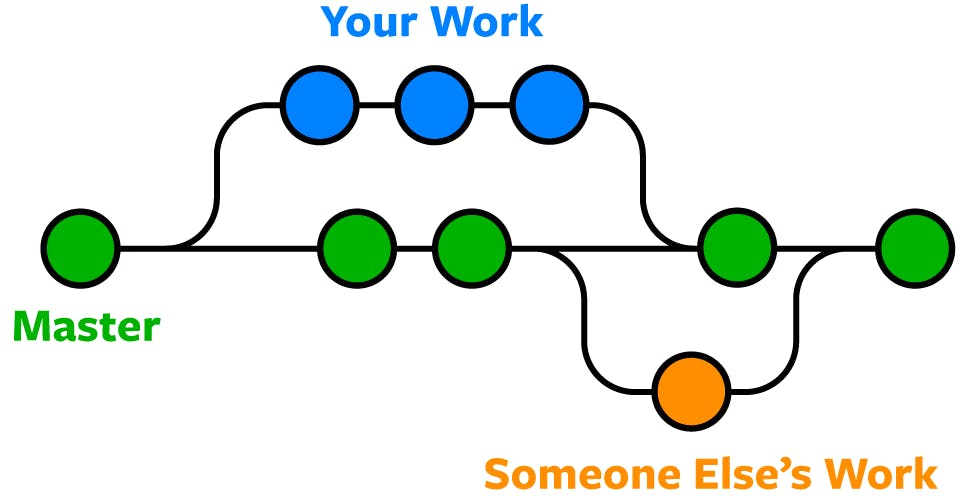
Git is a version control system. It tracks any changes made to files in a directory and keeps a record of previous versions of these files. This allows you to easily revert code changes with bugs. It also enables collaboration. Multiple people can work on the same code and use Git to merge their code into one branch once they are finished.

It is extremely important to learn how to use Git if you want to land a job in the tech industry. In any professional setting, you will probably be using some form of Git to collaborate with other members of your team. In my personal experience, both the companies I worked at used GitHub.
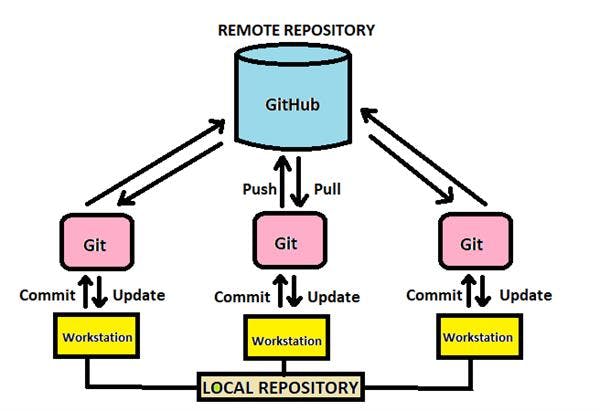
Usually, Git stores your files locally, but with GitHub, you can have an online location where your files and version history are stored. When working with multiple people this is a godsend, although merge conflicts make me sad.
Conventional Commits and other Git best practices
When using Git it is important to realize that you aren't doing it for yourself. Git best practices are important because you will be working with other people and they need to be able to understand and follow what you are doing.
Make sure you are committing often. Having a history of your code is helpful for testing and bailing you out if something happens to any unsaved files. It's like saving at a checkpoint in a video game, you can always just go back to a save point if you reach a dead end.
Create multiple branches and don't always directly push onto master or main. This is important once you start collaborating with others. It prevents you from pushing up buggy code which gives a clear distinction between what is a work in progress and what is tested and merged into the main branch.
I like following Conventional Commits which is a convention to name which helps you create an explicit commit history. This makes it easier to read and allows you to use automated tools such as automating CHANGELOGs. You should check out the website and read about how it works. If you think it fits your coding style feel free to adopt it into your toolbox!
Working with others
I mentioned previously that you will need to work with others when using Git. This is where Git really shines because of how easily it lets you asynchronously work on the same code someone else is.

Pull requests are the preferred way of reviewing and merging code. Usually once you are finished with a feature on your local branch you will push up the code to the remote repository (Github). Then you will open up a pull request/merge request. This notifies others that your code needs to be reviewed. Usually, collaborators will leave comments that you will need to fix. Once approved you can merge your code onto the main branch.
Resolving merge conflicts is not as big of a deal as it may seem. It will happen all the time because multiple people will be touching the same files. This only happens with Git cannot automatically merge 2 branches. Usually, what you have to do is check with the other developer that made the change and collaborate to make a solution that works for both of you.
Branching strategies are the last part of working with others. There will usually be an already established strategy when you are joining a company. The most common strategies are single branch, feature branching, and git flow. Single branch strategies are usually for when you are not working with others and pushing all changes to a single branch. Feature branching strategies create new branches for each new feature or bug, then merge them into the main branch. Git flow has 2 ongoing branches, usually main and develop. Features are developed on the develop branch and then merged into the main branch as a release.
My most useful Git commands
git init
This command creates a new git repository and it is usually one of the first things you do when starting a new project.
git remote add remote-name repository-name or url
This is usually the second command you would run when creating a new project. Adds a remote tracking branch and remote-name is usually origin. You usually put the repository url after the remote-name.
Example: git remote add origin https://github.com/user/repo.git
git status
Checks your current changes in your directory and shows you what has been staged, what hasn't, and any new files.
git add directory
Adds the files in the specified directory to be staged for the next commit. You can specify files to add through the directory. You can do this command as many times as you like and add as many files as you like to be staged before you commit.
Example: git add . or git add ./folder
git commit -m "commit-message"
This command commits to staging with a message. Commits are saved changes and explain to others what you have done in the project. Good commit messages are an important way to provide useful information in case you did something wrong and need to look back to previous changes to revert code.
Below this list, you will find a short guide to conventional commits.
Example:
Bad commit git commit -m "do the thing"
Good commit git commit -m "BREAKING CHANGE: 'extends' key in config file is now used for extending other config files"
git commit -am "commit-message"
Combines the top 2 commands and allows you to add and commit to staging at once. This only works on files that Git is already tracking. If you added new files to your repository you will still have to do git add directory
Example: git commit -am "feat: Zhu Li, do the thing!"
git branch branch-name
Creates a new branch with your branch name. This doesn't switch you to your new branch, it just creates it. Branching is great because it allows you to create a branch from the main source code to work on code in an isolated location.
Example: git branch new-feature
git checkout branch-name
Updates your files in your local repository to match the files on the branch in the tree. Any changes on you make to your code will bet kept on this branch and can be commited to the branch.
Example: git checkout old-feature
git checkout -b branch-name
This combines the top 2 commands by creating a new branch and then switching to it. Equivalent to using git branch branch-name then git checkout branch-name.
Example: git checkout -b feature
git branch -D branch-name
Deletes a branch in your local Git. You should typically do this after you merge in your code on your branch to the main branch. You can always recreate your branch in the future if you need to. Git will also tell you if there are unmerged changes on your branch so you should not be afraid to delete old branches with merged code.
Example: git branch -D merged-branch
git reset --hard commit-hash
Resets your local files to the specific commit-hash. This is a potentially dangerous command if you have uncommitted changes. Any untracked files or directories will be discarded and you will not be able to recover them
Example: git branch -D 4c85240745b8ae1fe405ad5893ad66cd2a8afee3 or git branch -D HEAD (resets your files to HEAD)
git push
Pushes your code from your local repository to the remote repository. If you are using GitHub the files in the repository will reflect the same files as your local repository after pushing.
git push --force
This is the same command as above but it allows you to rewrite the history on the remote repository with your local history. When doing this you must be careful because it may be easy to delete history and code accidentally, especially if you are working with other people.
git push --set-upstream remote-name branch-name repository-name
Upstream branches are the remote repository's way of tracking your local branch. They are also called the remote tracking branch. You have to set up an upstream branch before you start pushing your code to the remote repository.
Example: git push --set-upstream origin new-feature
git push -u remote-name branch-name repository-name
This does the exact same thing as the above command
Example: git push -u origin new-feature
git fetch
Fetch downloads commits, files, and refs from a remote repository on your local repo. It allows you to see what others have been working on and lets you test their code on your local repository.
git pull
Incorporates changes from a remote repository into the current branch. If your current branch is behind the remote, then by default it will fast-forward the current branch to match the remote.
git diff commit-hash-source commit-hash-destination
Diff shows the difference between a commit and one of the commit's ancestors. You use the commit hash in the command to specify which commits to compare.
Example: git diff 0da94be 59ff30c
git merge branch-name
Incorporates any changes from a different branch into your current branch. Git will attempt to automatically merge any commits for you. However, if there are files that are changed by both branches you will need to manually resolve any conflicts.
git cherry-pick commit-hash
Takes the changes from a specific commit and adds them to your current branch. You specify the commit by the commit hash. This is great in a team setting where you can cherry-pick specific pieces of code to test or use in your own local repository.
Example: git cherry-pick 59ff30c
Conclusion
Before you can collaborate with other developers knowing how to use Git is a prerequisite. That means if you're trying to break into the tech industry learning how to use Git is imperative.
Now that you know how to use Git the next thing you should do is create a developer portfolio showcasing all your projects. You can read my guide on that here.


